Introduction to Linux
Introduction to Linux
Table of Contents
- Introduction and aims
- Getting started on the command line - Basic unix
- Files and directories
- Looking inside files
- Searching the content of files using grep
- Processing columns with awk
- Loops
- Bash scripts
- UNIX quick reference guide
Introduction and Aims
Introducing Linux
Unix is the standard operating system on most large computer systems in scientific research, in the same way that Microsoft Windows is the dominant operating system on desktop PCs. Linux is an open source, free to use operating system using the Unix architecture.
Operating systems such as Linux, macOS and MS Windows each perform the important job of managing the computer’s hardware (screen, keyboard, mouse, hard disks, network connections, etc…) on your behalf. They also provide you with tools to manage your files and to run application software. They each offer a graphical user interface (desktop). These desktop interfaces look different between the operating systems, use different names for things (e.g. “directory” versus “folder”) and have different images, but they mostly offer the same functionality.
Linux is a powerful, secure, robust and stable operating system which allows dozens of people to run programs on the same computer at the same time. This is why it is the preferred operating system for large-scale scientific computing. It runs on all kinds of machines, from mobile phones (Android), desktop PCs… to supercomputers.
Why Linux?
Increasingly, the output of biological research exists as in silico data, usually in the form of large text files. Unix is particularly suitable for working with such files and has several powerful and flexible commands that can be used to process and analyse this data. One advantage of learning Unix is that many of the commands can be combined in an almost unlimited fashion. So if you can learn just six Unix commands, you will be able to do a lot more than just six things.
Unix contains hundreds of commands, but to conduct your analysis you will probably only need 10 or so to achieve most of what you want to do. In this course we will introduce you to some basic Unix commands followed by some more advanced commands and provide examples of how they can be used in bioinformatics analyses.
General points to consider
- Using Linux can be daunting, but is pretty straightforward once you get the hang of it.
- Learning Linux is much like learning other languages - it takes time to master and requires practice.
- However, even proficient users of Linux still rely of “google” and other sources of information all the time to help them with day-to-day tasks. So…
- if you are learning to use a new tool, google it.
- if you can’t remember all of the different parameters or how to run a command, google it.
- if you are struggling due to errors or don’t know what a certain error means, google it.
- some very practical points that will make your life easier:
- Linux is case sensitive
- typing “ls” is not the same as typing “LS”.
- You need to put a space between a command and its argument
- for example, “more myfile” will show you the contents of the file called myfile; “moremyfile” will just give you an error!
- Linux is not psychic! If you misspell the name of a command or the name of a file, it will not understand you.
- Many of the commands are only a few letters long; this can be confusing until you start to think logically about why those letters were chosen
- “ls” for “list”, “rm” for “remove” and so on.
- Often, when your command is running fine, nothing happens - this is good! You just need to wait until the command has completed its task.
- However, when your command is not working, you will be presented with the error and/or a “usage statement” that tells you what is needed to run the command
- more often than not, the error will tell you the problem, ie, “file not found”
- sometimes errors are really subtle and small, for example, due to a spelling mistake, or perhaps you have omitted a space. You will get better at spotting these, but keep a look out!
- Linux is case sensitive
- If you want to know more about Linux and its commands there are plenty of resources available that provide a more comprehensive guide, for example:
- http://Linuxhelp.com
- https://learn.datacamp.com/
Some useful Linux commands
| Command | What it does |
|---|---|
| ls | Lists the contents of the current directory |
| mkdir | Makes a new directory |
| mv | moves or renames a file |
| cp | copies a file |
| rm | removes a file |
| cat | concatenates two or more files |
| less | displays the contents of a file one page at a time |
| head | displays the first ten lines of a file |
| tail | displays the last ten lines of a file |
| cd | change directory |
| pwd | print the working directory |
| find | find files matching an expression |
| grep | search for a pattern within a file |
| wc | count the lines, words, characters or bytes in a file |
| kill | stop a process |
| jobs | list the processes that are running |
Tips to get you started
- Make sure you carefully read the text in this manual and on the command line! It contain lots of hints that should help you to answer some of the questions
- Light blue boxes contain instructions for running commands
- lines that start with a hash, ie ”#” are a comment line - do not type these out.
- lines that start with the following symbols should be typed out. Different programming languages have different symbols,
$: this is a shell prompt- everything performed in this module is using the shell prompt
>: this is a R prompt- this may appear in other modules
- note that you also see this on the shell prompt if you have not completed a command correctly
>>>: this is the python prompt- you are not going to be using python here, but may choose to learn it in your own time as it is a very versatile programming language commonly used in bioinformatics
- note that you don’t actually type out the command prompt symbol, i.e. ignore the “$” at the start of the line, just type out the command after it.
Getting started on the command line - Basic unix
Introduction to the terminal
- Lets get started with the command line
-
In this workshop, we will be using Ubuntu, a version of Linux which was specially designed for PCs.
- We will use a terminal window to type in our Linux command line.
- This is similar to the “command prompt” window on MS Windows systems, which allows the user to type DOS commands to manage files.

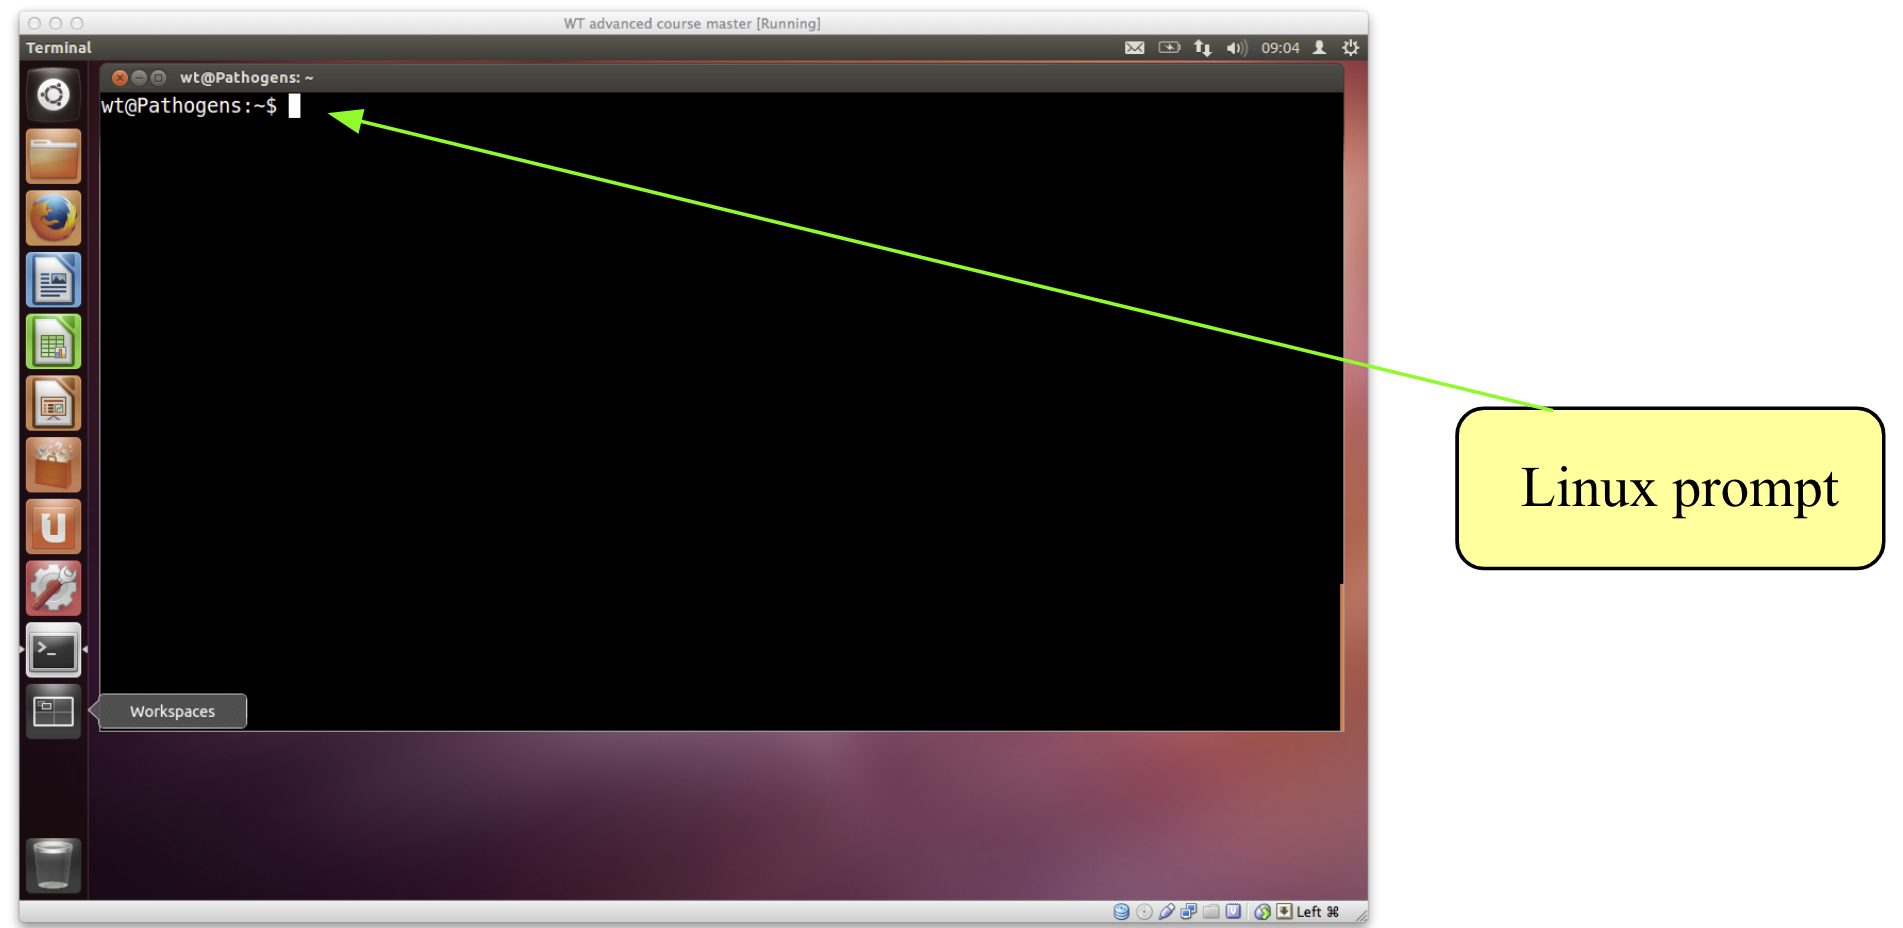
- You should see a window labelled “Terminal” which will be empty except for a ’$’ character at the top left.
- The
$character is the Linux prompt, similar to “C:" in DOS. - Note: the prompt will often be different on different Linux computers, for example it may be displayed as a ‘%’ character.
- The
- All Linux programs may be run by typing commands at the Linux prompt $. The command line tells the computer what to do.
- You can type commands directly into the terminal at the ‘$’ prompt.
# your first command – move to the working directory to get started!
cd /home/manager/Module_2_Linux_scripting
- A list of useful commands can be found on a previous page.
- Many of them are two- or three-letter abbreviations.
- The earliest Linux systems (circa 1970) only had slow Teletype terminals, so it was faster to type
rmto remove a file than ‘delete’ or ‘erase’. This terseness is a feature of Linux which still survives.
Command line arguments
- Typing any Linux command for example
ls,mvorcdat the Linux prompt with the appropriate variables, such as files names or directories, followed by pressing the enter key will result in the tasks being performed. - You can alter the behaviour of these commands by specifying certain options (often called “parameters” or “flags”) when typing in the command line.
- The ‘command’ is separated from the options and arguments by a space.
- Additional options and/or arguments can be added to the commands to affect the way the command works.
- Options usually have one dash and a letter (e.g. -h) or two dashes and a word (–help) with no space between the dash and the letter/word.
- Arguments are usually filenames or directories.
- For example, to get a list of files in the terminal you can use the
lscommand with no other options.- This tells the computer you want a list of all the files in the current directory.
- The same information is also displayed in the file browser but with nice looking pictures of folders and files.

- Lets try out some different examples of the
lscommand:
# List the contents of a directory
$ ls
# List the contents of a directory with extra information about the files
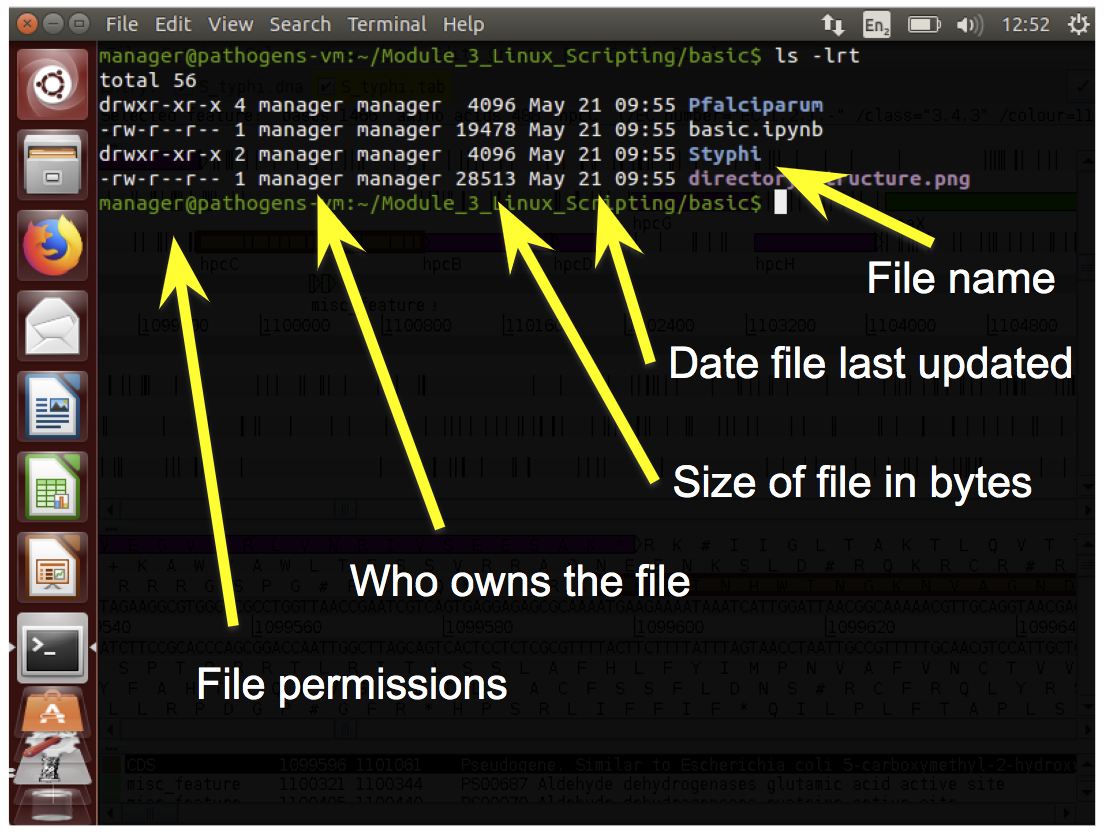
$ ls –l
# List all contents including hidden files & directories
$ ls –al
# List the contents of the directory called basic with extra information
$ ls –l basic
# Suggested usage – this will be the most frequent command used as a bioinformatician!
$ ls –ltr
# where:
–l gives the long format,
-t sort the output by time,
–r reverse sorts the output.
# here, we have merged three flags together, ie. rather than "ls -l -r -t", we have combined the "-lrt".
# Using "ls -lrt" will therefore provide a detailed list, with the most recent files at the bottom. This is really useful if you have a lot of files in the same directory
- By using the
–l(lowercase L for “long”) option we can change the behaviour of thelscommand. Instead of printing out a simple list, it will print out additional information about each file. There is a space between the commandlsand the–loption. There is no space between the dash and the letter l.
Permissions
- Every file has permissions which restrict what can be done with a file or directory.
| Permission | What it does |
|---|---|
| Read (r) | permission to read from a file/directory |
| Write (w) | permission to modify a file/directory |
| Execute (x) | Tells the operating system that the file contains code for the computer to run, as opposed to a file of text which you open in a text editor. |
- You can see in the image there are 9 characters in the file permissions column, or three sets of three:
- The first set of permissions (characters 2,3,4) refer to what the owner of the file can do
- the second set of permissions (5,6,7) refers to what members of the Linux group can do
- the third set of permissions (8,9,10) refers to what everyone else can do.
- by setting permissions at different levels, it is possible to control who can read, write, and execute commands in different areas of a multi-user file system, for example, a centralised high-performance computer.
Files and Directories
- Directories are the Linux equivalent of folders on a PC or Mac.
- They are organised in a hierarchy, so directories can have sub-directories and so on.
- Directories are very useful for organising your work and keeping your account tidy
- for example, if you have more than one project, you can organise the files for each project into different directories to keep them separate.
- it can take some getting use to remembering where everything is in your directory system, so it is a good idea to develop a system of organisation so you can remember where all your files are easily.
- You can think of directories as rooms in a house.
- You can only be in one room (directory) at a time.
- When you are in a room you can see everything in that room easily.
- To see things in other rooms, you have to go to the appropriate door and crane your head around.
- Linux works in a similar manner, moving from directory to directory to access files.
- The location or directory that you are in is referred to as the current working directory.
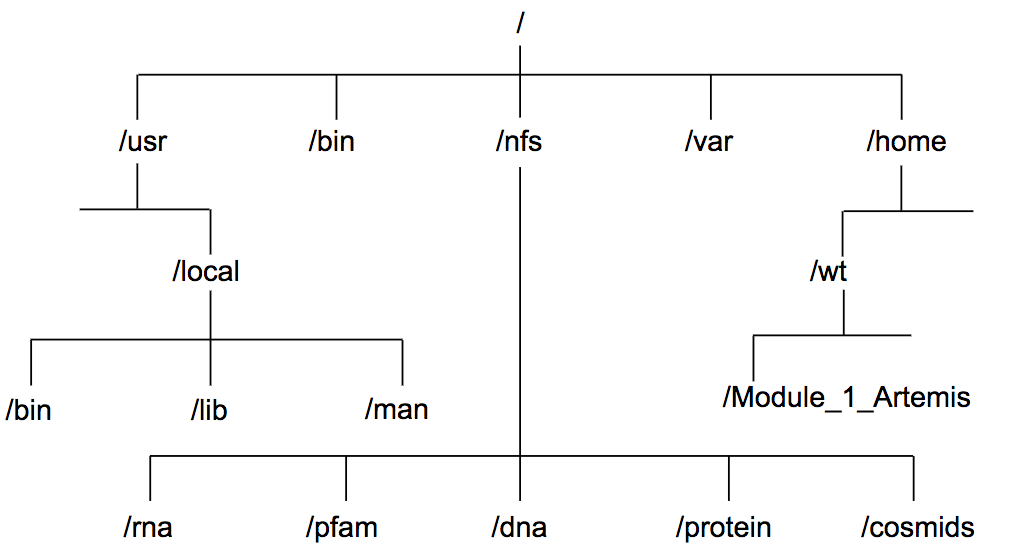
- Therefore, if there is a file called
genome.fastain the dna directory its location or full pathname can be expressed as/nfs/dna/genome.fasta.
pwd - find where you are
- The command
pwdstands for “print working directory”. - A command (also known as a program) is something which tells the computer to do something. Commands are therefore often the first thing that you type into the terminal (although we’ll show you some advanced exceptions to this rule later).
- As described above, directories are arranged in a hierarchical structure. To determine where you are in the hierarchy you can use the pwd command to display the name of the current working directory. The current working directory may be thought of as the directory you are in, i.e. your current position in the file-system tree.
# To find out where you are, type this into your terminal.
$ pwd

$ cd basic

$ pwd
- Remember: Unix is case sensitive,
PWDis not the same aspwd. pwdwill list each of the folders you would need to navigate through to get from the root of the file system to your current directory.- This is sometimes referred to as your ‘absolute path’ to distinguish that it gives a complete route rather than a ‘relative path’ which tells you how to get from one folder to another.
- More on that shortly …
cd - change current working directory
- The command
cdstands for “change directory”. - The cd command will change the current working directory to another, in other words allow you to move up or down in the directory hierarchy.
- To move into the genome_1 directory, complete the following:
- Note, you’ll remember this more easily if you type this into the terminal rather copying and pasting.
- Also remember that you can use tab completion to save typing all of it.
# Move into the genome_1 directory using the cd command
$ cd genome_1/

# Use the pwd command to check you are in the right place
$ pwd

# it is often useful to list the contents of your new location after moving
$ ls -lrt
- There are some short cuts for referring to directories:
| Command | What it means |
|---|---|
. |
Current directory (one full stop) |
.. |
Directory above (two full stops) |
~ |
Home directory (tilda) |
/ |
Root of the file system (like C: in Windows) |
- Try the following commands, what do they do?
# List contents of current directory
ls .

# List the contents of directory above your current location
ls ..

# list the contents of the home directory
ls ~

# similarly, we can move up and down the directory structure using the shortcuts.
# For example, try the following, using "pwd" or "ls -lrt" after each command to see where you are:

cd genome_1/

cd ../genome_2/

cd

cd /home/manager/Module_2_Linux_scripting
- we have subtly introduced you to a new concept of moving around between your directories - “absolute” and “relative” paths.
- an absolute path is one where we write the full path to the directory, eg.
/home/manager/Module_2_Linux_scripting.- The advantage of writing the full path is that regardless of where you are in the directory structure, the opererating system will know where to go.
- The disadvantage is that it requires more typing.
- a relative path is a short desciption of a path, that is relative and specific to where you are in the directory structure. eg. if you are in the
/home/manager/Module_2_Linux_scripting/genome_1/directory, you can move up one directory usingcd .., two directories to the home directory usingcd ../../, or even move directories using ` cd ../genome_2/` .- The advantage of using a relative path is that is it quick to type.
- The disadvantage is that it is very specific to where you currently are in the directory structure, and if you move to a different location, the same command will not work.
- You will see some examples of relative and absolute paths in later modules.
- If you use relative paths, great, but it does require a good understanding of your directory structure and where everything is located.
- A common error message on the command line is “file not found” and is commonly related:
- (1) being in the wrong directory, and/or
- (2) a relative path is used in the command and because you might be in the wrong directory, the relative path is incorrect.
- To avoid these problems, always knowing where you are using the
pwdcommand, or checking that you have the expected files present in your working directory usingls -lrt, is good practice.
Tab completion - “make tab-it and hab-it”
- Typing out file names is really boring and you’re likely to make typos which will at best make your command fail with a strange error and at worst overwrite some of your carefully crafted analysis.
- “Tab completion” is a trick which normally reduces this risk significantly.
- Instead of typing out
ls genome_2/, try typingls gand then press the tab character (instead of Enter).- Most of the rest of the folder name should just appear.
- As you have two folders with similar names, you will need to give your terminal a bit of a hand to work out which one you want.
- Pressing the tab key twice will try and autocomplete what you’ve started typing or give you a list of all possible completions.
- This saves a lot of typing and typos.
cp - copy a file
- The command
cpstands for “copy”. - The
cpcommand will copy a file from one location to another and you will end up with two copies of the file.
# To copy the file genome_1.gff to a new file called genome_1.withseq use:
$ cp genome_1.gff genome_1.withseq.gff

# Use ls to check the contents of the current directory for the copied file:
$ ls -lrt
mv - move a file
- The
mvcommand stand for “move”. - The
mvcommand will move a file from one location to another. This moves the file rather than copies it, therefore, you end up with only one file rather than two. - When using the command, the path or pathname is used to tell Unix where to find the file.
- You refer to files in other directories by using the list of hierarchical names separated by slashes.
- For example, the file called bases in the directory genome has the path genome/bases.
- If no path is specified, Unix assumes that the file is in the current working directory.
# To move the file genome_1.withseq.gff from the current directory to the directory above use:
$ mv genome_1.withseq.gff ..

# Use the ls command to check the contents of the current directory and the directory above to see that genome_1.withseq.gff has been moved.
$ ls –lrt
$ ls –lrt ../

# you could also change directory to check the file moved
$ cd ../
$ ls -lrt
rm - delete a file
- The command
rmstands for “remove”. - The
rmcommand will delete a file permanently from your computer, so take care using it!
# To remove the copy of the genome_1 gff file, called genome_1.withseq.gff use:
$ rm genome_1.withseq.gff

# Use ls to check the contents of the current directory for the copied file:
$ ls -lrt
- Linux, as a general rule, does exactly what you ask, and does not ask for confirmation.
- Unfortunately there is no “recycle bin” on the command line to recover the file from, so you have to be careful with the
rmcommand.
Exercises
- Many people panic when they are confronted with a Unix prompt! Please don’t! All the commands you need to solve these exercises are provided above. Don’t be afraid to make a mistake.
- If you get lost ask a demonstrator. If you are a person skilled at Unix, be patient this is only a short exercise.
- To begin, open a terminal window and navigate to the basic directory in the
Module_2_Linux_Scriptingdirectory (remember use the commandcd), and then complete the exercise below.
- Use the
lscommand to show the contents of the basic directory. - How many files are there in the
genome_2directory? - What is the largest file in the
genome_2directory? - Move into the
genome_2directory. - How many files are there in the
fastadirectory? - Copy the file
genome_2.bedin thegenome_2directory into the annotation subdirectory. - Move all the fasta files in the directory
genome_2to the fasta subdirectory. - How many files are there in the
fastadirectory?
Looking inside files
- A common task is to look at the contents of a file. This can be achieved using several different Unix commands,
less,headandtail. Let us consider some examples.
less
- The
lesscommand displays the contents of a specified file one screen at a time. - To test this command, open a terminal window on the computer, navigate to the directory files in the
Module_2_Linux_Scriptingdirectory and type the following command followed by the enter key:
# Use the less command to open a gff
$ less genome_1.gff
- The contents of the file
genome_1.gffis displayed one screen at a time, to view the next screen press the spacebar. - As
genome_1.gffis a large file this will take a while, therefore, you may want to escape or exit from this command.- To do this, press the
qkey - this kills the less command and returns you to the Unix prompt.
- To do this, press the
lesscan also scroll backwards if you hit thebkey.- Another useful feature is the slash key,
/, to search for an expression in the file.- Try it, search for the gene with locus tag t0038.
- What is the start and end position of this gene?
head and tail
- Sometimes you may just want to view the text at the beginning or the end of a file, without having to display all of the file.
- The
headandtailcommands can be used to do this.
- The
- The
headcommand displays the first ten lines of a file, whereas thetailcommand shows the last ten lines of a file.
# To look at the beginning of the file genome_1.gff file use:
$ head genome_1.gff

# To look at the end of genome_1.gff use:
$ tail genome_1.gff

- The amount of the file that is displayed can be increased by adding extra arguments.
- To increase the number of lines viewed from 10 to 25 add
-n 25to the command:
- To increase the number of lines viewed from 10 to 25 add
# To look at the last 25 lines of genome_1.gff use:
$ tail –n 25 genome_1.gff
- In this case you’ve given tail an argument in two parts.
- the
-nsays that you want to specify the number of lines to show and the 25 bit tells it how many.
- the
- Unlike earlier when we merged arguments like
ls -lhatogether, it’s not a good idea to merge multiple two part arguments together because otherwise it is ambiguous which value goes with which argument.-nis such a common argument for tail and head that it even has a shorthand: -n 25 and -25 mean the same thing.
Saving time
- Saving time while typing may not seem important, but the longer that you spend in front of a computer, the happier you will be if you can reduce the time you spend at the keyboard.
- pressing the up/down arrows will let you scroll through previous commands entered.
- If you highlight some text, middle clicking on the mouse will paste it on the command line.
- Tab completion doesn’t just work on filenames, it also works on commands.
- Try it by typing fin and pressing tab…
- fin
- Try it by typing fin and pressing tab…
- Although tab completion works on commands and file names, unfortunately it rarely works on options or other arguments.
Getting help: man , -h , –help
- There are a number of different ways you can be help with a command. Not all of these work for each command you will encounter, however, they are worth knowing and using to learn about new tools, and troubleshoot using commands that may not initially work for you.
- For example, to get help using the
tailcommand, we could use one of the following:
# I’m stuck – help!
$ man tail

#Or
$ tail –h

#Or
$ tail --help
- The prefix
manwill typically give extensive detail about the command and its options, whereas–hand--helptend to give an abbreviated version. -
IMPORTANTLY, each will give an example command, or usage statement.
- There are several other useful commands that can be used to manipulate and summarise information inside files and we will introduce some of these next,
cat,sort,wcanduniq.
Writing to files
- So far we’ve been running commands and outputting the results into the terminal. That’s obviously useful but what if you want to save the results to another file?
# Extract the first line of genome_1.gff and output to a new file
$ head -1 genome_1.gff > first_genome_1_line.txt
- It’s likely that nothing obvious will have happened….
- This is because the
>character has redirected the output of the head command. Instead of writing to the standard output (your terminal) it sent the output into the filefirst_genome_1_line.txt. - Note that tab completion works for
genome_1.gffbecause it exists but doesn’t work forfirst_genome_1_line.txtbecause it doesn’t exist yet.
cat
cat(short for “concatenate”) is another way of reading files but, unlikeless, it just prints the entire contents of the file onto your standard output.- Try it on
first_genome_1_line.txt.
# Read you new file using the cat command
$ cat first_genome_1_line.txt

# we don’t actually need this file, so lets remove it
rm first_genome_1_line.txt
- The command cat can be used to join (or concatenate as the name suggests) two or more files into a single file.
- The order in which the files are joined is determined by the order in which they appear in the command line. You can use
catand the>symbol to join files together. - Having looked at the beginning and end of the
genome_1.gfffile you should notice that in the GFF file the annotation comes first, then the DNA sequence at the end. - We can recreate this file by using cat to join two separate files,
genome_1.noseq.gffandgenome_1.fa, that contain the annotation and DNA sequence, respectively forgenome_1. - To join together these files use:
# Join the two files using the cat command
$ cat genome_1.noseq.gff genome_1.fa > genome_1.concatenated.gff

# lets check that the new file has been generated
$ ls -lrt
wc - counting
- The command
wcstands for “word count”, and is useful for counting lines (-l), words (-w) or characters (-c). - There are two ways you could use it:
# use the wc command on the file directly
$ wc -l genome_1.gff

# use cat to open the file, and “pipe” the result to the wc command
$ cat genome_1.gff | wc -l
- Did you get the same answer?
- In the first example, you tell wc the file that you want it to review (i.e.
genome_1.gff) and pass the -l option to say that you’re only interested in the number of lines. - In the second example you use the | symbol which is also known as the pipe symbol. This pipes the output of
cat genome_1.gffinto the input ofwc -l.- This means that you can also use the same wc tool to count other things.
# For example to count the number of files that are listed by ls use:
$ ls | wc –l

# You can connect as many commands as you want. For example:
$ ls | grep ".gff" | wc -l
sort - sorting values
- The
sortcommand lets you “sort” the contents of the input. - When you sort the input, lines with identical content end up next to each other in the output.
- This is useful as the output can then be fed to the uniq command (see below) to count the number of unique lines in the input.
- First, navigate your way to the
genome_2directory.
# For example, to sort the contents of a BED file use:
$ sort genome_2.bed | head

# look at the other end of the file using tail
$ sort genome_2.bed | tail

# To sort the contents of a BED file on a particular column, we can specify that using the "-k" flag.
$ sort -k 2 -n genome_2.bed
- The
sortcommand can sort by multiple columns e.g. 1st column and then 2nd column by specifying successive -k parameters in the command. - Why not have a look at the manual for sort to see what these options do?
- Remember that you can type
/followed by a search phrase, n to find the next search hit, N to find the previous search hit and q to exit.
- Remember that you can type
uniq - finding unique values
- The
uniqcommand extracts “unique” lines from the input. - It is usually used in combination with
sort, and can be used to count unique values in the input.
# To get the list of chromosomes in the genome_2 bed file use:
$ awk '{ print $1 }' genome_2.bed | sort | uniq
- How many chromosomes are there?
- You will learn more about the awk command later in this course.
-
Warning:
uniqis really stupid; it can only spot that two lines are the same if they are right next to one another. Your therefore almost always want to sort your input data before usinguniq. - Do you understand how this command is working? Why not try building it up piece by piece to see what it does?
# Lets see what happens when we build a command using pipes
$ awk '{ print $1 }' genome_2.bed | less
$ awk '{ print $1 }' genome_2.bed | sort | less
$ awk '{ print $1 }' genome_2.bed | sort | uniq | less
Exercises
- Open up a new terminal window, navigate to the files directory in the
Module_2_Linux_Scriptingdirectory and complete the following exercise:- Use the
headcommand to extract the first 500 lines of the filegenome_1.gffand store the output in a new file calledgenome_1.500.gff. - Use the
wccommand to count the number of lines in thegenome_2.bedfile. - Use the
sortcommand to sort the filegenome_2.bedon chromosome and then gene position. - Use the
uniqcommand to count the number of features per chromosome in thegenome_2.bedfile.
- Hint: use the
mancommand to look at the options for theuniqcommand. Or peruse thewcorgrepmanuals. There’s more than one way to do it!
- Use the
Searching the content of files using grep
- A common task is extraction of information from a large file or many large files.
- This is achieved using the Unix command
grep. This stands for “Globally search for a Regular Expression and Print”.
# First we need to go to the correct directory
$ cd /home/manager/Module_2_Linux_Scripting/grep
Simple pattern matching
- We will search a small example file in “BED” format.
- This is a tab delimited file format, which can contain 10 or more columns, although only the first three are required.
- The file format is described in full at http://genome.ucsc.edu/FAQ/FAQformat#format1
- We will use columns 1 to 5
- Sequence name
- Start position (starting from 0 not 1)
- End position (starting from 0 not 1)
- Feature name
- Score (used to store gene expression level in our examples)
# Use cat to view the file contents
$ cat gene_expression.bed
- This is a short example but files of this format may contain hundreds or thousands of lines, making it impractical to read them manually.
# We are interested in chromosome 2 so wish to find all lines involving it using grep.
$ grep chr2 gene_expression.bed
- This has shown us all lines containing the text “chr2”.
- We may wish to refine our search further.
# We can search the output of the grep search using a pipe
$ grep chr2 gene_expression.bed | grep +
- As
grepreports matches to a string anywhere on a line, such simple searches can have undesired consequences.
# We will modify our original search slightly to find all data on chromosome 1
$ grep chr1 gene_expression.bed
- You should notice that, in addition to lines from chromosome 1,
grepreports lines from chromosome 10 also. - Similarly, annotations can be inconsistent, leading to further problems with simple searches.
# Look at another bed file we have provides
$ cat gene_expression_sneaky.bed
- You will notice some inconsistency in column 4.
# See what happens when we grep for genes on chromosome 1, on the negative strand. (Note, we put the minus sign in quotes to stop Unix interpreting this as an option in grep
$ grep chr1 gene_expression_sneaky.bed | grep "-"
- You will notice that
grepreports several lines form genes which aren’t on chromosome 1.- This is because each of them contains the text “chr1” and the text “-” somewhere.
- We need a way to refine our searches further.
Regular expressions
- Regular expressions provide a way of defining more specific patterns to match.
- We will concentrate on some of the most useful and commonly used regular expressions.
- Firstly, we can specify a match only to text at the start of a line using the
^(carat) symbol.
# Repeat the first part of our search but including ^. Note, to be safe, we will put the search term in quotes.
$ grep '^chr1' gene_expression_sneaky.bed
- We can now refine our search further to avoid the remaining genes not on chromosome 1.
# This can be done by searching for a tab character following the chromosome name. Tab is represented by ‘\t’. For reasons beyond the scope of this course,we must start the search term with a dollar symbol to recognise tab.
$ grep $'^chr1\t' gene_expression_sneaky.bed
- As expected, there are now three genes left, all on chromosome 1.
- We will now include the second part of our original grep to search for genes only on the negative strand. However, we will modify this with a regular expression to only find characters at the end of the line.
# Searching for a string at the end of the line is done using a $ symbol at the end of the search term. In this case, we will backslash the - symbol for safety.
$ grep $'^chr1\t' gene_expression_sneaky.bed | grep '\-$'
- We now have only one gene reported and it is on chromosome 1 and on the negative strand.
- Further, more complex examples of regular expressions and their use may be found in the reference guide at the end of this chapter.
Useful grep command line options
- A common requirement is to count the number of matches to a search term.
- This could be done by piping the output of
grepintowc -l, but can be done more succinctly usinggrep -c(c = count) option.
# We will repeat a previous search but include the -c option to count matches rather than just returning them.
$ grep -c  $'^chr1\t' gene_expression_sneaky.bed
- Another common requirement is to make searches case insensitive.
- By default,
grepis case sensitive so grepping for ‘acgt’ will not return hits to ‘ACGT’.
# Consider the fasta file sequences.fasta.
$ cat sequences.fasta

# A simple search for ACGT will not hit all relevant sequences.
$ grep ACGT sequences.fasta
- Therefore, we need to make the search case insensitive.
# The -i option does this:
$ grep -i ACGT sequences.fasta
- Another commonly used requirement from
grepis to find the reverse of a match, i.e. return all lines which do not match the search term.
# The -v option does this:
$ grep -v $'^chr1\t' gene_expression_sneaky.bed
Replacing matches to regular expressions
- In Unix, it is possible to replace every match to a character string or regular expression with something else using the command
sed. This stands for “stream editor”.
# As an example, we wish to replace each incidence of the characters ‘chr’ at the beginning of the line in gene_expression.bed with ‘chromosome
$ sed 's/^chr/chromosome/' gene_expression.bed
- Note: this will output to the terminal window. The output can be redirected to a new file using the
>character.
# For example:
$ sed 's/^chr/chromosome/' gene_expression.bed > gene_expression_new.bed
Processing columns with awk
awkis a programming language named after its three inventors: Alfred Aho, Peter Weinberger and Brian Kernighan.awkis powerful at processing files, particularly column based files, which are commonplace in bioinformatics e.g. BED, GFF and SAM files.- Although complex programs can be written in
awk, we will use it directly on the command line. - Before we begin we need to change directory to the correct location.
$ cd ~/Module_2_Linux_Scripting/awk/
awkreads a file line by line, splitting each line into columns.- This makes it easy to extract a single column or multiple columns.
- We will use a GFF file for all of our examples.
# First we will view the GFF file to look at its structure.
$ cat genes.gff
- The columns in a GFF file are separated by tabs and having the following meanings
- Sequence name
- Source (the name of the program that made the feature)
- Feature - the type of feature e.g. gene or CDS
- Start position
- Stop position
- Score
- Strand (+ or -)
- Frame (0, 1 or 2)
- Optional extra information in the form key1=value1; key2= value2; etc.
- The score, strand and frame may set to “.” if they are not relevant to the feature.
- The final column may or may not be present and can contain any number of key:value pairs.
# We can ask awk just to give us the first column of a file. awk calls the columns $1, $2 etc. with $0 representing the full line.
$ awk -F"\t" '{print $1}' genes.gff
- A little explanation is required:
- The option
-F"\t"is needed to tellawkthat the columns are tab separated. - For each line of the file, awk simply does what is inside the curly brackets, in this case, simply print the first column.
- The option
- Try to modify the command to list each chromosome once only. (Hint: you’ll need to pipe your output into a Unix command we saw earlier.)
Filtering input files
- Like
grep,awkcan be used to filter lines from a file. - However, as
awkis column based, it makes it easier to filter on the properties of the column of interest.
# The filtering criteria can be added before the braces. For example, this will extract just chromosome 1 data from the file.
$ awk -F"\t" '$1=="chr1" { print $0 }' genes.gff
- There are two important things to note here:
$1=="chr1"means that column 1 must exactly match “chr1”.- The
"(print $0}"part only happens when the first column is equal to “chr1”
- In general, awk commands a made up of two parts:
- a pattern (e.g. $1==”chr1”)
- an action (e.g. “print $0”)
- The pattern defines which line the action is applied to.
- Actually, in this example, the action could be omitted as
awkassumes you want to print the whole line unless told otherwise. - Similarly, if the pattern is omitted,
awkassumes that the action should be applied to every line, as in the firstawkcommand we used.
# In this example we will search for just the genes from chromosome 1.
$ awk -F"\t" '$1=="chr1" && $3=="gene"' genes.gff
- Similarly, “||” is used in awk to mean “or”.
# In this example we will search for features which are on chromosome 1 or are repeats
$ awk -F"\t" '$1=="chr1" || $3=="repeat"' genes.gff
- So far, we have only filtered using strings. Numbers can also be used.
# In this example we will search for genes on chromosome 1 which start before base position 1100
$ awk -F"\t" '$1=="chr1" && $3=="gene" && $4 < 1100' genes.gff
- If we do not specify a column,
awkwill match the entire line as it assumes it is searching$0.
# Note that -F"\t" can be omitted here. As we're searching the whole line, the column delimiter is not relevant.
$ awk '/repeat/' genes.gff
- Similarly to
grep, via its-voption,awkcan invert its match. In this case, we use the"!~"operator to represent “does not match”.
# Here we simply look for the inverse of the previous search.
$ awk ‘!/repeat/’ genes.gff
Sanity checking files
- Never ever automatically trust the content of a bioinformatics file, even if you generated it.
- With the
awkwe have learnt so far, we can do some basic sanity checks on a GFF file
# One thing we may want to do is check that each gene has been assigned a strand. To do this, we need to check whether column 7 contains either a + or - symbol.
$ awk -F"\t" '$3=="gene" && !($7 == "+" || $7 == "-")' genes.gff
- Likewise, we may want to check whether the coordinates of all features make sense.
# To do this, we simply need to check that the end coordinate of the feature is not less than the start coordinate.
$ awk -F"\t" '$5 < $4' genes.gff
- A final simple sanity check is that each feature has either 8 or 9 columns.
# We do this using a special variable in awk, “NF”, which is the number of columns in a line. Remember to distinguish this from “$NF”, which referes specifically to the final column. This search will give no output if all features pass.
$ awk -F"\t" 'NF<8 || NF>9' genes.gff
Changing the output
- In addition to filtering files,
awkcan be used to change the output. - Potentially, every value in a column can be changed to something else.
# As a simple example, we will change the value in the source column (column 2) to a new value for each line.
$ awk -F"\t" '{$2="new_source"; print $0}' genes.gff
- This is close to what is required but, if you look closely at the output, you will notice that it is no longer tab separated.
- To fix this, we need to use another special variable called
"OFS"(output field separator).
# This is achieved by adding "BEGIN{OFS="\t"}" to the code, as below. Before awk reads any lines of the file, it reads the BEGIN block of code, in this case, changing OFS to a tab character.
$ awk -F"\t" 'BEGIN{OFS="\t"} {$2="new_source"; print $0}' genes.gff
Exercises
- Looking at the file grep/exercises.fasta, write a grep command to only output the sequence names.
- How many sequences does this file contain?
- How many sequences contain unknown bases (denoted by “n” or “N”)?
- Do any sequences have the same name? You don’t need to find the repeated names, just how many names are repeated.
- Hint: You may need to look back at some earlier Unix commands.
- Looking at the files awk/exercises.bed, find the names of the contigs in the file.
- How many contigs are there?
- How many features are on the positive strand?
- And, how many on the negative strand?
- How many genes are there?
- How many genes have no strand assigned to them? (i.e. no final column)
- How many genes have repeated names? You don’t need to find the names.
Loops
- It is common in bioinformatics to run the same analysis on many files.
- Suppose we have a script which runs an analysis we wish to run on 100 data files.
- It is both tedious and error type the same command 100 times so instead we use a loop.
- There are several types of loop used by Unix but we will concentrate on two, the
forloop and thewhileloop.
# We will use a for loop to run wc on the files in the directory loop_files/ . Note you need to be in the "Module_2_Linux_scripting" directory to run this command.
$ for filename in loop_files/*; do wc ${filename}; done
- Notice the syntax used.
- The $ symbol denotes the variable used within the loop.
- The semi-colon is used to separate the parts of the loop.
- The * acts as a wildcard so all files are iterated over.
# Next we will use a while read a file line-by-line, and only print lines for chromosome 1 and on the sense strand
$ while read -r chr start end name strand; do \
		if [[ $chr == "01" && $strand == "1" ]]; then \
		echo $chr $start $end $name $strand; \
		fi; \
		done < loop_files/file.1
- let us break this while loop down:
while read -r chr start end name stranddefines the columns that will be passed as variables to the next part of the command.- We could call these anything we like, but it make sense to given the names that relate to the data
< loop_files/file.1is the input file that will be read line-by-line, and is passed into the command using the<.- the while loop starts with the
doand finishes with thedone. - inside the while loop, there is the
ifcommand - if the conditions are TRUE, ie., the chr ==1 AND strand ==1, then weechoor print the data in the columns chr, start, end, name & strand. These were set as variables at the start of the while command - The
ifcommand starts withthen, and finishes withfi.
BASH scripts
- So far, we have run single commands in the terminal.
- However, it is often useful to run multiple commands to process data and produce output.
- These commands can be put into a script which can be run on input data.
- This allows for reproducibility meaning the same analysis can be run on multiple datasets in different locations.
Your first script
- It is traditional when learning a new programming language (in this case BASH) to write a simple script which says “Hello world!”. We will do this here.
# In a terminal window, navigate to your home directory and create a directory called scripts
$ cd
$ mkdir scripts
$ cd scripts

# Open a text editor to create your script. Do not use a word processor. An example is gedit. If you don’t have a favourite text editor already run this.
$ gedit &

# In the editor window type ‘echo “Hello world!”’ and save the file with the name "hello.sh".
- Congratulations! You have created your first script.
- We will now run the script.
# First check to see whether the file in place then run it.
$ ls hello.sh
$ bash hello.sh
Setting up a generic directory for scripts
- It would be useful to be able to run scripts we’ve written from anywhere on the filesystem without telling Unix where the script is or that it is a BASH script.
- To tell Unix that a script is a BASH script, edit it so the first line reads:
#!/usr/bin/env bash
- Next we need to make the script executable. To do this, we use the Unix command “chmod”
# chmod changes the permissions of the file
$ chmod +x hello.sh
- The final thing we need to do is change our setup so that Unix can find our scripts without explicitly being told where they are.
- When a command is typed, Unix searches a list of directories looking for it.
- This list is stored as an environmental variable known as the
PATH. - Some of the directories in the
PATHare looked at for all users but others can be set explicitly for an individual user.
# First we want to check what our PATH currently is.
$ echo $PATH
- This has given us the list of directories currently used for commands.
- You will notice that it does not include your scripts directory.
# We can modify the PATH environment variable in the current terminal
$ export PATH=$PATH:~/scripts
- If you want this change to be permanent, i.e. so that Unix finds your scripts directory in a new terminal or after a fresh login, add the above line to a file called
~/.bashrc. - Each user has a
.bashrcfile. It stores environment variables and aliases for the individual user account. - On a Mac, the equivalent file is called
~/.bash_profile. - This file is only usually looked at when logging in or opening a new terminal.
# To check the change has worked, open a new terminal and run your script with no location set.
$ hello.sh
- With this set up, to create a new script, you can copy and edit an existing script or create a new one
$ cd ~/scripts
$ touch myscript.sh
$ chmod +x myscript.sh
myscript.shcan now be edited using a text editor.
Getting command line options and adding output text
- Usually we want a script to read in options from the user, for example the name of an input file.
- Inside the script, these parameters are given the names
$1,$2,$3etc. - We have provided a simple example in which the user provides a file name and a number.
- The script simply prints the file name on screen together with the top few lines of the file (the number given as the second command line option).
# We can view this example using the cat commend we’ve seen earlier
$ cd ~/Module_2_Linux_scripting/bash_scripts/scripts
$ cat options_example.sh
- Having looked at the script, run it to observe the output
$ ./options_example.sh test_file 2
- You will notice that, whilst the script works, is not very readable.
- It is better to replace “$1” and “$2” with meaningful variable names.
# We have provided a second version of the script which is more readable
$ cat options_example.2.sh
- We have set the variable
filenameto be$1and the variablenumber_of_linesto be$2. - This may seem unimportant with a simple script but, as you write more complex scripts or adapt them to particular datasets, you will realise that setting meaningful variable names saves a lot of time.
Exercises
- Write a script which takes a file name from the user, if the file exists, print a human readable message telling the user how many lines the file has.
- Navigate to the base
Module_2_Linux_scriptingdirectory. Use a loop to run the script written in exercise 1 on the files in theloop_filessubdirectory. - Write a script that takes a GFF filename as input. Make the script produce a summary of various properties of the file.
- An example input file is provided called
bash_scripts/exercise_3.gff. - Use your imagination as to what you want to summarise.
- You may want to look back at the
awksection of the manual for inspiration.
- An example input file is provided called
UNIX quick reference guide
1. Looking at files and moving them around
| command | what is it doing |
|---|---|
pwd |
Tell me which directory I’m in |
ls |
What else is in this directory |
ls .. |
What is in the directory above me |
ls foo/bar/ |
What is inside the bar directory which is inside the foo/ directory |
ls -lah foo/ |
Give the the details (-l) of all files and folders (-a) using human readable file sizes (-h) |
cd ../.. |
Move up two directories |
cd ../foo/bar |
Move up one directory and down into the foo/bar/ subdirectories |
cp -r foo/ baz/ |
Copy the foo/ directory into the baz/ directory |
mv baz/foo .. |
Move the foo directory into the parent directory |
rm -r ../foo |
remove the directory called foo/ from the parent directory |
find foo/ -name "*.gff" |
find all the files with a gff extension in the directory foo/ |
2. Looking in files
| command | what is it doing |
|---|---|
less bar.bed |
scroll through bar.bed |
grep chrom bar.bed \| less -S |
Only look at lines in bar.bed which have ‘chrom’ and don’t wrap lines (-S) |
head -20 bar.bed |
show me the first 20 lines of bar.bed |
tail -20 bar.bed |
show me the last 20 lines |
cat bar.bed |
show me all of the lines (bad for big files) |
wc -l bar.bed |
how many lines are there |
sort -k 2 -n bar.bed |
sort by the second column in numerical order |
awk '{print $1}' bar.bed \| sort \| uniq |
show the unique entries in the first column |
3. Grep
| command | what is it doing |
|---|---|
grep foo bar.bed |
show me the lines in bar.bed with ‘foo’ in them |
grep foo baz/* |
show me all examples of foo in the files immediately within baz/ |
grep -r foo baz/ |
show me all examples of foo in baz/ and every subdirectory within it |
grep '^foo' bar.bed |
show me all of the lines begining with foo |
grep 'foo$' bar.bed |
show me all of the lines ending in foo |
grep -i '^[acgt]$' bar.bed |
show me all of the lines which only have the characters a,c,g and t (ignoring their case) |
grep -v foo bar.bed |
don’t show me any files with foo in them |
4. awk
| command | what is it doing |
|---|---|
awk '{print $1}' bar.bed |
just the first column |
awk '$4 ~ /^foo/' bar.bed |
just rows where the 4th column starts with foo |
awk '$4 == "foo" {print $1}' bar.bed |
the first column of rows where the 4th column is foo |
awk -F"\t" '{print $NF}' bar.bed |
ignore spaces and print the last column |
awk -F"\t" '{print $(NF-1)}' bar.bed |
print the penultimate column |
awk '{sum+=$2} END {print sum}' bar.bed |
print the sum of the second column |
awk '/^foo/ {sum+=$2; count+=1} END {print sum/count}' bar.bed |
print the average of the second value of lines starting with foo |
5. Piping, redirection and more advanced queries
grep -hv '^#' bar/*.gff | awk -F"\t" '{print $1}' | sort -u
# grep => -h: don't print file names
# -v: don't give me matching files
# '^#': get rid of the header rows
# 'bar/*.gff': only look in the gff files in bar/
# awk => print the first column
# sort => -u: give me unique values

awk 'NR%10 == 0' bar.bed | head -20
# awk => NR: is the row number
# NR%10: is the modulo (remander) of dividing by 10
# awk is therefore giving you every 10th line
# head => only show the first 20

awk '{l=($3-$2+1)}; (l<300 && $2>200000 && $3<250000)' exercises.bed
# Gives:
# contig-2 201156 201359 gene-67 24.7 -
# contig-4 245705 245932 gene-163 24.8 +
# Finds all of the lines with features less than 300 bases long which start
# after base 200,000 and end before base 250,000
# Note that this appears to have the action before the pattern. This is
# because we need to calculate the length of each feature before we use it
# for filtering. If they were the other way around, you'd get the line
# immediatly after the one you want:

awk '(l<300 && $2>200000 && $3<250000) {l=($3-$2+1); print $0}' exercises.bed
# Gives:
# contig-2 201156 201359 gene-67 24.7 -
# contig-2 242625 243449 gene-68 46.5 +
6. A script
#!/usr/bin/env bash
set -e # stop running the script if there are errors
set -u # stop running the script if it uses an unknown variable
set -x # print every line before you run it (useful for debugging but annoying)

if [ $# -ne 2 ]
then
echo "You must provide two files"
exit 1 # exit the programme (and number > 0 reports that this is a failure)
fi

file_one=$1
file_two=$2

if [ ! -f $file_one ]
then
echo "The first file couldn't be found"
exit 2
fi

if [ ! -f $file_two ]
then
echo "The second file couldn't be found"
exit 2
fi

# Get the lines which aren't headers,
# take the first column and return the unique values
number_of_contigs_in_one=$(awk '$1 !~ /^#/ {print $1}' $file_one | sort -u | wc -l)
number_of_contigs_in_two=$(awk '/^[^#]/ {print $1}' $file_two | sort -u | wc -l)

if [ $number_of_contigs_in_one -gt $number_of_contigs_in_two ]
then
echo "The first file had more unique contigs than the second"
exit
elif [ $number_of_contigs_in_one -lt $number_of_contigs_in_two ]
then
echo "The second file had more unique contigs"
exit
else
echo "The two files had the same number of contigs"
exit
fi
7. Pro tips
- Always have a quick look at files with
lessorheadto double check their format. - Watch out for data in headers and make sure you don’t accidentally include it in your output.
- Watch out for spaces, especially if you’re using
awk- if in doubt, use-F"\t". - Build regular expressions slowly, bit by bit.
- If you did something smart but can’t remember what it was, try typing history.
- man the_name_of_a_command often gives you help.
- Google is an excellent resource. Particularly prioritise results from stackoverflow.com, seqanswers.com and biostars.org.
8. Build your commands slowly
- If you wanted me to calculate the sum of all of the scores for genes on contig-1 in a bed file, it’s best to run each of the following commands before moving onto the next:
# check which column is which and if there are any headers
head -20 bar.bed

# have a look at the scores
head -20 bar.bed | awk '{print $5}'

# check the contigs don't look wierd
awk '{print $1}' bar.bed | sort -u | less

# check the genes don't look wierd
awk '{print $4}' bar.bed | sort -u | less

# check that I can spot genes
awk '$4 ~ /gene-/' bar.bed | head -20

# check I can find genes on contig-1
awk '($1 == "contig-1" && $4 ~ /gene-/)' bar.bed | head -20

# check my algorithm works on a subset of the data
head -20 bar.bed | awk '($1 == "contig-1" && $4 ~ /gene-/) {sum+=$5}; END {print sum}'

# apply the algorithm to all of the data
awk '($1 == "contig-1" && $4 ~ /gene-/) {sum+=$5}; END {print sum}' bar.bed
9. Which tool should I use?
- You should probably use
awkif:- your data has columns.
- you need to do simple maths.
- You should probably use
grepif:- you’re looking for files which contain some specific text (e.g.
grep -r foo bar/: look in all the files in bar/ for any with the word ‘foo’).
- you’re looking for files which contain some specific text (e.g.
- You should probably use
findif:- you know something about a file (like it’s name or creation date) but not where it is.
- you want a list of all the files in a subdirectory and its subdirectories etc.
- You should write a
scriptif:- your code doesn’t fit easily on a single line.
- you are doing something you will want to repeat at a later date.
- you are doing something another person may wish to do.
- you are doing something sensitive (e.g. deleting a lot of files).
- you are doing some repeatedly.
License

This work is licensed under a Creative Commons Attribution 4.0 International License.